A forest plot is the single most recognizable output of a meta-analysis. It displays each study's effect estimate alongside a pooled summary, letting readers instantly see where studies agree, where they diverge, and how much weight each one carries. If you are preparing a manuscript, a grant, or a thesis, knowing how to build and interpret this plot correctly is non-negotiable.
Try our free free forest plot maker to build publication-ready plots without writing a single line of code.
What You Need Before You Start
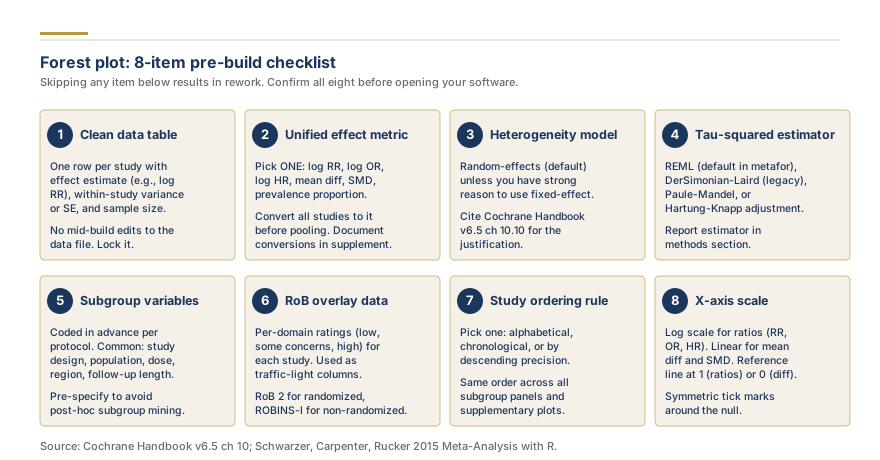
Before generating a forest plot, you need three things assembled in a clean spreadsheet or data file.
Effect size estimates for each study: odds ratios, risk ratios, standardized mean differences (Cohen's d or Hedges' g), or correlation coefficients depending on your outcome type.
Variance or confidence interval bounds for each estimate. Most software accepts either standard errors or the lower and upper bounds of the 95% confidence interval directly.
Study labels: author names, publication years, and sample sizes. These appear on the left axis and help readers locate familiar studies.
If you have not yet computed your effect sizes, use the free effect size tool to convert raw group means, proportions, or correlation coefficients into a common metric before importing them.
Choosing Your Heterogeneity Model: REML vs DerSimonian-Laird
The choice of variance estimator determines how much weight your random-effects model assigns to smaller versus larger studies, and it affects the width of the pooled confidence interval.
DerSimonian-Laird (DL) is the classic method. It uses a method-of-moments estimator for between-study variance (tau-squared) that is fast and widely cited. However, it tends to underestimate tau-squared when the number of studies is small, which can produce confidence intervals that are too narrow.
REML (Restricted Maximum Likelihood) is the modern default in most software packages including R's metafor and Stata's metan. REML produces less biased tau-squared estimates, especially with fewer than 20 studies, and is now recommended by the Cochrane Handbook for most applications.
For a fixed-effect model, the choice does not apply because fixed-effect models assume no between-study variance. Use a fixed-effect model only when you have a strong theoretical reason to believe all studies are estimating exactly the same underlying true effect, which is rare in practice.
Practical guidance: default to REML unless a specific journal or method requires DL. When you switch estimators, recheck your I-squared, tau-squared, and the prediction interval width, because these will change.
Building the Plot: A Step-by-Step Walkthrough
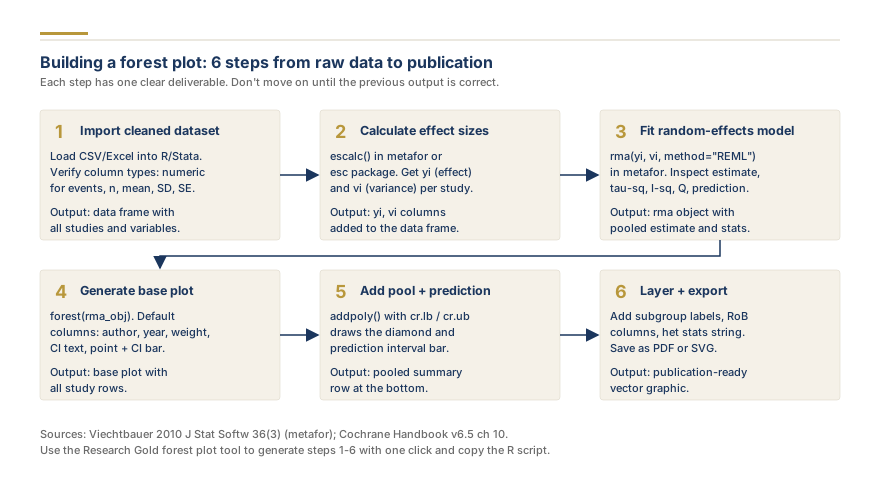
Step 1: Import your data. In the forest plot creator, paste your study labels, effect sizes, and confidence interval bounds into the data entry panel. The tool accepts Cohen's d, Hedges' g, odds ratios, risk ratios, and correlation coefficients.
Step 2: Select your effect measure and model. Choose the effect size type that matches your data. Select random-effects with REML as your starting model. The plot will render immediately with study squares scaled by inverse variance weight.
Step 3: Read the study squares and lines. Each square represents one study's point estimate. The square's size reflects the study's weight in the analysis: larger squares mean more weight. The horizontal line through the square is the 95% confidence interval. A line that crosses the null (zero for mean differences, one for ratios) indicates a non-statistically-significant result for that study individually.
Step 4: Interpret the diamond. The pooled effect appears as a diamond at the bottom. The center of the diamond is the summary estimate. The left and right tips are the confidence interval limits. A narrow diamond means more precise pooled evidence; a wide diamond indicates high heterogeneity or few studies.
Step 5: Add the prediction interval. The prediction interval is the range where you expect 95% of true effects to fall in future similar studies. It is wider than the confidence interval and is arguably more important for clinical decision-making. If your confidence interval excludes the null but your prediction interval crosses it, the pooled effect may not replicate in every population. Always report the prediction interval alongside I-squared.
Step 6: Check your heterogeneity statistics. I-squared above 50% suggests substantial heterogeneity. Tau-squared gives the absolute variance in true effects. The Q statistic p-value tests whether heterogeneity exceeds chance, though it has low power with few studies.
A Complete Worked Example in R (metafor)
A point-and-click tool is fine for a first plot, but a thesis committee will expect you to know what the software is doing. This is the same analysis from raw data to finished figure in metafor, the package most journals expect for a reproducible meta-analysis.
Start with six randomized trials of a continuous outcome, each with group means, standard deviations, and sample sizes:
library(metafor)

dat <- data.frame(
  study = c("Allen 2018", "Brooks 2019", "Cardoso 2020",
            "Devi 2021", "Esposito 2022", "Farouk 2023"),
  m1i  = c(52, 49, 55, 47, 51, 50),  sd1i = c(10, 9, 11, 8, 10, 12), n1i = c(40, 35, 60, 28, 45, 33),
  m2i  = c(48, 47, 50, 46, 45, 49),  sd2i = c(11, 10, 10, 9, 11, 10), n2i = c(38, 36, 58, 30, 44, 31)
)

# Step 1: compute Hedges' g and its variance for every study
dat <- escalc(measure = "SMD",
              m1i = m1i, sd1i = sd1i, n1i = n1i,
              m2i = m2i, sd2i = sd2i, n2i = n2i,
              data = dat, slab = study)

# Step 2: fit the random-effects model (REML is the default and recommended)
res <- rma(yi, vi, data = dat, method = "REML")
res          # pooled g, 95% CI, tau^2, I^2, Q-test

# Step 3: draw a publication-ready forest plot with a prediction interval
forest(res, addpred = TRUE, header = "Study",
       xlab = "Standardized Mean Difference (Hedges' g)",
       mlab = "Random-effects model (REML)")
Read the output in this order. The res summary gives the pooled Hedges' g with its 95% confidence interval (the diamond), tau^2 and I^2 for heterogeneity, and the Q-test. The addpred = TRUE argument draws the prediction interval as a dashed line through the diamond, which is the single most under-reported element on a forest plot: the confidence interval describes uncertainty in the average effect, while the prediction interval describes the range of true effects a new study might show. When I² is non-trivial, the prediction interval is usually much wider than the confidence interval, and reporting only the latter overstates consistency.
To express the diamond as an odds ratio or risk ratio instead, set measure = "OR" in escalc() (supplying event and non-event counts) and add atransf = exp to forest() so the axis displays the ratio rather than its logarithm. The underlying inverse-variance machinery, the weights, the pooled estimate, and the confidence interval, is identical to what our forest plot interpretation guide walks through by hand. If you would rather not write code, our forest plot generator produces the same model output and a downloadable figure.